Sometimes, it’s nice to sew something that is quick and easy and almost guaranteed to succeed. This is one of those projects.
It’s a small drawstring bag I made in between other projects. It was a gift.
The pattern is the Lined Drawstring Bag from Jeni Baker Patterns. It comes in eight sizes and this is the smallest. My finished bag is about 4.5″ by 3.25″ by 1.5″(or 11.5 cm by 8 cm by 4 cm).
This really is tiny – just the right size for a handful of dice. It’s not the first time I’ve used the pattern. You can see some other examples in an older post.
I used quilting cotton left over from a quilt I made. The flat cord is from Our Social Fabric, a non-profit fabric store selling donated deadstock fabric and supplies.
This pattern is pretty foolproof and I’d highly recommend it.
Summary
Pattern Review:Lined Drawstring Bag from Jeni Baker Patterns. Fabric: Quilting cotton (from my stash). Sizes: Available in eight sizes. This is the “Tiny” size. Cost: Pattern: $9 (but made four times). Fabric: 0$. Sewing Level: Easy. Modifications: I used cord instead of fabric ties. Results: Great!
This isn’t the first time I’ve sewn with a vintage 1990s pattern and it’s unlikely to be the last. It’s a lot of fun, as long as you are prepared to do a little extra work.
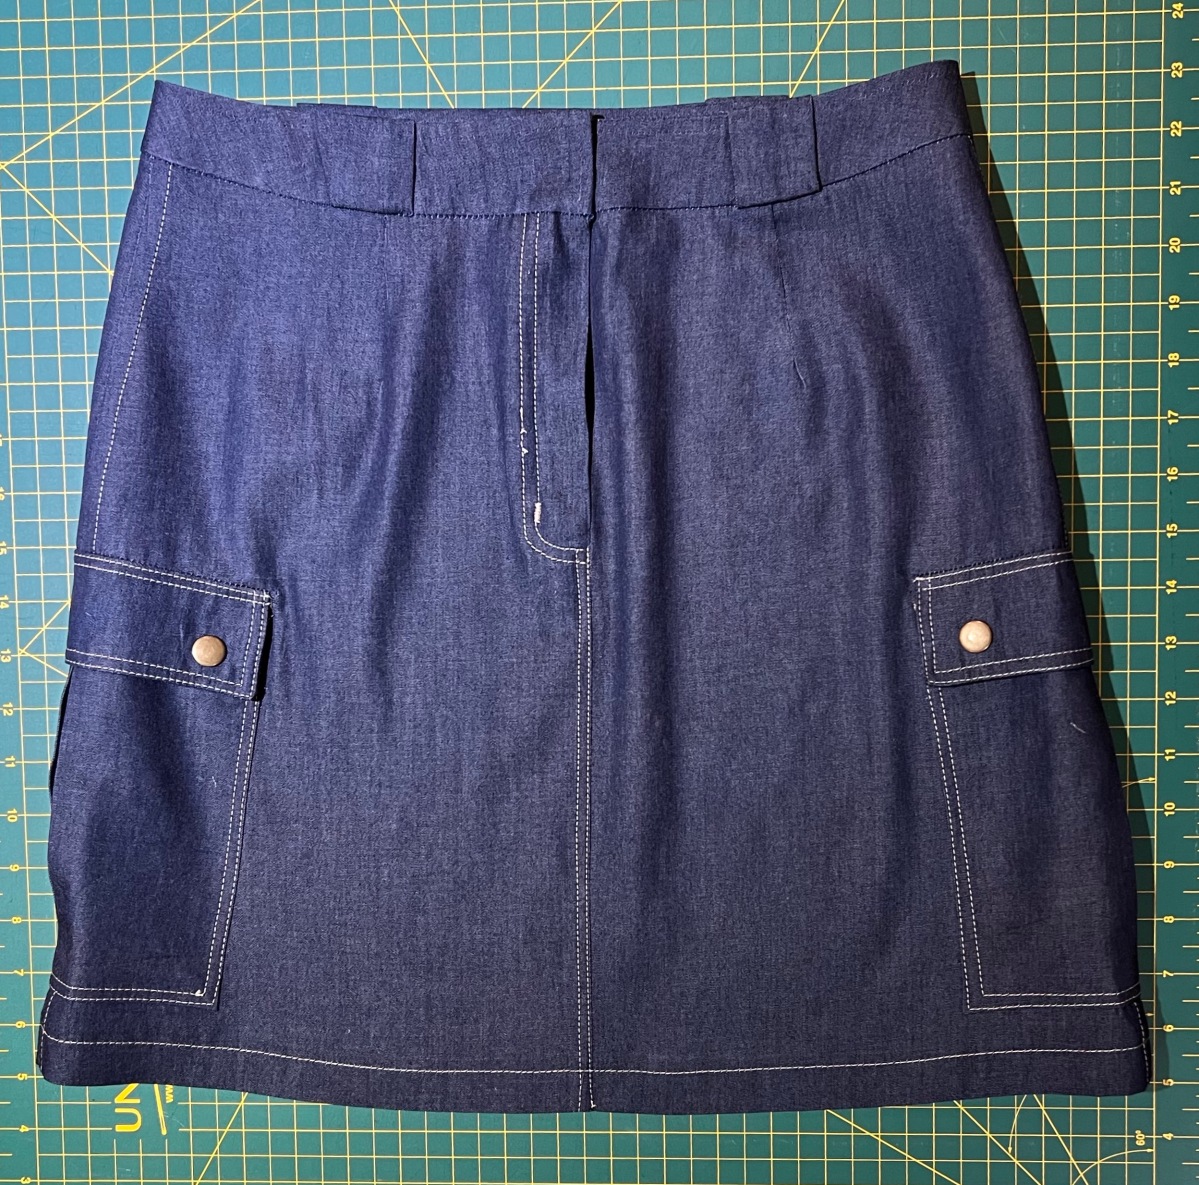
I’ve wanted a jean maxi skirt for a while, but I couldn’t find the right pattern – until I spotted Vogue Elements V9997, circa 1999.
This pattern is for an a-line maxi skirt, with carpenter-style pockets, sewn-on fly with fly shield, and belt carriers. And, it wasn’t too expensive. I bought it online through a vintage pattern seller.
Vogue 9997 cira 1999.
I really like the Vogue Elements series patterns. I have a few of these. There are a lot of 90s looks which have come back into style in the past couple of years, but few current patterns that match. Also, these patterns mostly have good lines and quality construction details. Of course, some are a bit dated, but many are not.
I also like that the size range for the series is 6-22. That’s larger than current Vogue patterns offer, per envelope, and accommodates all the bodies in my household. There aren’t options in larger sizes though, if that’s what you need.
V997 wasn’t without its flaws. But more on that later.
Photographing dark clothing is really difficult!
First, let’s talk about the fabric. I used a dark cotton chambray instead of heavy denim. Maxi skirts made of denim tend to be hot, stiff, heavy, and not always very comfortable. I wanted something lighter that I could wear in the heat of summer. This has a little swish.
I bought the fabric in-store at Fabricville. It’s the same fabric I used previously to make another vintage pattern, McCall’s M2220. This fabric comes in many hues, and I have no idea which one this is. It’s just the darkest they had in the store that day. Some of the photos here make it look quite blue, but it’s really a dark indigo. It’s hard to photograph dark clothing.
Skirt front with topstitching details.
I used Gutermann mara thread in bright brown (#405) for the topstitching, and I really like the look. I did double topstitching everywhere, except for the hem. All the inside seams are faux flat-felled.
Belt carriers.
I used a size 12/80 universal needle (this was shirting after all), except on the waistband where I used a 14/90 jeans needle.
Skirt hem.
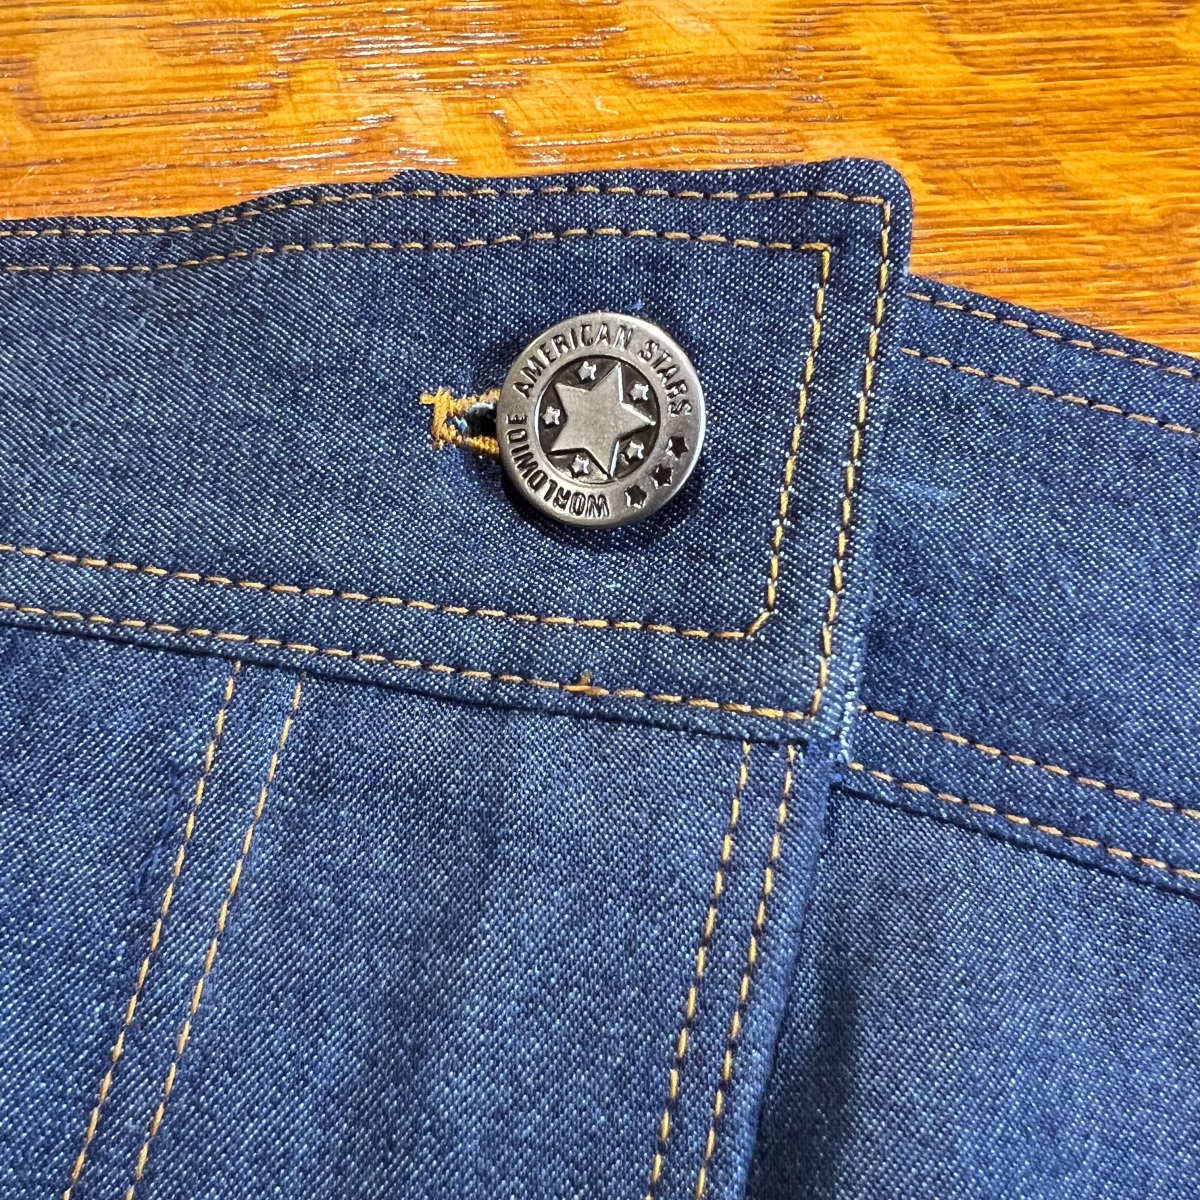
I used a metal jeans zipper and jeans button. I used the Prym Vario pliers to install the button, and this is one of my favourite sewing tools ever. It’s just so precise! I probably should have gone with bronze hardware to match the thread, but I had silver on hand.
This was also a bit of a practice run on two fronts. First, I’m hoping to make some jeans soon, and I wanted a bit of low-risk practice with topstitching, making pockets, and a jean-style fly. Second, I have some more precious fabric waiting to be sewn into another maxi skirt, and I wanted to test the pattern (coming soon!). So you could call this a very wearable toile.
The fly is a sewn-on jeans fly with fly shield and double top-stitching.
The fly is a sewn-on jeans fly with fly shield and double top-stitching. I love how this is considered an “easy” pattern by Vogue. (sigh)
I added bar tacks. One is so pretty, and I guess the others I’d qualify as adequate. Don’t look too closely! I’d also recommend not sewing your bar tacks through the hem of your skirt. lolcry.
I am very happy with the results, but in the highly unlikely event that you sew with this hard-to-find vintage pattern, you will need to make three (pretty easy) adjustments.
1. Draft a straight waistband
This pattern is described as having a “below-waist” waistband. By this, they apparently mean about 7cm (3 inches) below the waist. That is very low. Dear reader, it is not actually 1999, and I’ve had four kids.
I dutifully cut out the waistband as drafted, but it did not fit. And yet, the skirt without the waistband fit great. This is a curved waistband, and it is possibly the most curved I’ve ever seen, and I’ve sewn a lot of waistbands in my time. It’s just odd. I doubt it would fit most bodies. In any case, this waistband ended up in the trash.
I wanted a high-waisted version of this skirt anyway, so I drafted a very straight waistband. You can read a tutorial that explains what I did here. But essentially, I measured the top of the skirt, then cut out a waistband a couple inches longer on each end, and then transferred the markings and proceeded as per the instructions. An alternative would be to borrow a waistband from another pattern, but a straight waistband worked well with a high-waist and wasn’t especially difficult. It also doesn’t use a lot of extra fabric. I didn’t adjust the skirt panels in any way.
2. Lower the back pockets
Because this is drafted to be low on the hip, if you place the back pockets where drafted, but raise the waist, the pockets will be very, very high. I recommend making the pockets, and adding them at the last possible moment. This way you can pin them to the skirt and get the most flattering placement for your figure. The a-line design means there is lots of room to do this, even when the skirt is fully assembled, and it isn’t too fiddly a task.
Pretty pockets. I used an empty ice cream bucket to trace the circles. You can still see the chalk lines.
My pockets were so000 pretty, but in the end, I decided not to add them. I tried on the skirt with a couple of tops, and I found that if I wore it with something on the dressier side (say, a turtleneck and blazer), the pockets always landed at an awkward point. Without pockets it looks a bit leaner and there were more wardrobe possibilities. That said, if I had used a fabric that looked less like real jeans, I would have included them. With the dark chambray and all the top-stitching, I thought it I had a pretty good “jeans” vibe as it was.
3. Lengthen the skirt
With most big four skirt patterns, there is a little extra length to adjust for folks of different heights. Of course, if you raise the waist on this pattern, you cut into that wiggle room.
This pattern is drafted to be “above ankle”, but I wanted my skirt to be as long as possible without dragging in the dirt. I didn’t lengthen the skirt, and that’s exactly what I ended up with. However, I’m 166cm (5’6″) tall – the exact height this pattern was drafted for. If you are even a little taller, you’ll want to add a little length, just in case. It’s an a-line skirt though, so it isn’t very difficult.
Do you need to adjust the front pockets? I didn’t, and I like the look as is. If they were longer, and you had anything in them, they would bang against your legs when you walked. The back pockets were the correct size as well, though that depends much more on individual morphology.
I ended up with exactly what I wanted. This is an on-trend skirt that I can dress down for summer in the backyard or dress up for work and wear year-round.
Metal jeans button.
Summary
Pattern Review: Vogue Elements 9997 circa 1999, available in sizes 6-22. Length: Maxi. Fabric: Dark wash indigo chambray from Fabricville. This was labelled denim, but it is shirting. I used about 1.5m, even though I had to cut a new waistband. The pattern calls for 2m. Notions and Equipment: Needle: 12/80 universal for most, jeans 14/90 for topstitching the waistband. Gutermann mara thread in bright brown (#405).
Size: 20. Cost: Pattern: $14. Fabric: About $15. Hardware: About $4. Sewing Level: Easy according to Vogue, but I’d say average. Modifications: Raised the waist, cut a straight waistband, and skipped the pockets. Results: On trend!
I have been looking for the perfect sling bag, but they are always never quite right. Good thing I know how to sew!
My needs are pretty simple. I just want to be able to carry the basics without a lot of extra weight, keep everything zipped up for security, and keep everything dry on the occasional hike in the woods.
I chose the Sandhill Sling pattern by Noodlehead Patterns. It’s just the right size. It can carry all my daily basics, and then some. It also can fit an iPad mini (or an e-reader)!
The pattern is excellent in every way. The instructions are incredibly clear, and there is a sew-along with YouTube videos, photos, blog posts, and illustrations. It even has links/QR codes at key points that lead you right to those videos.
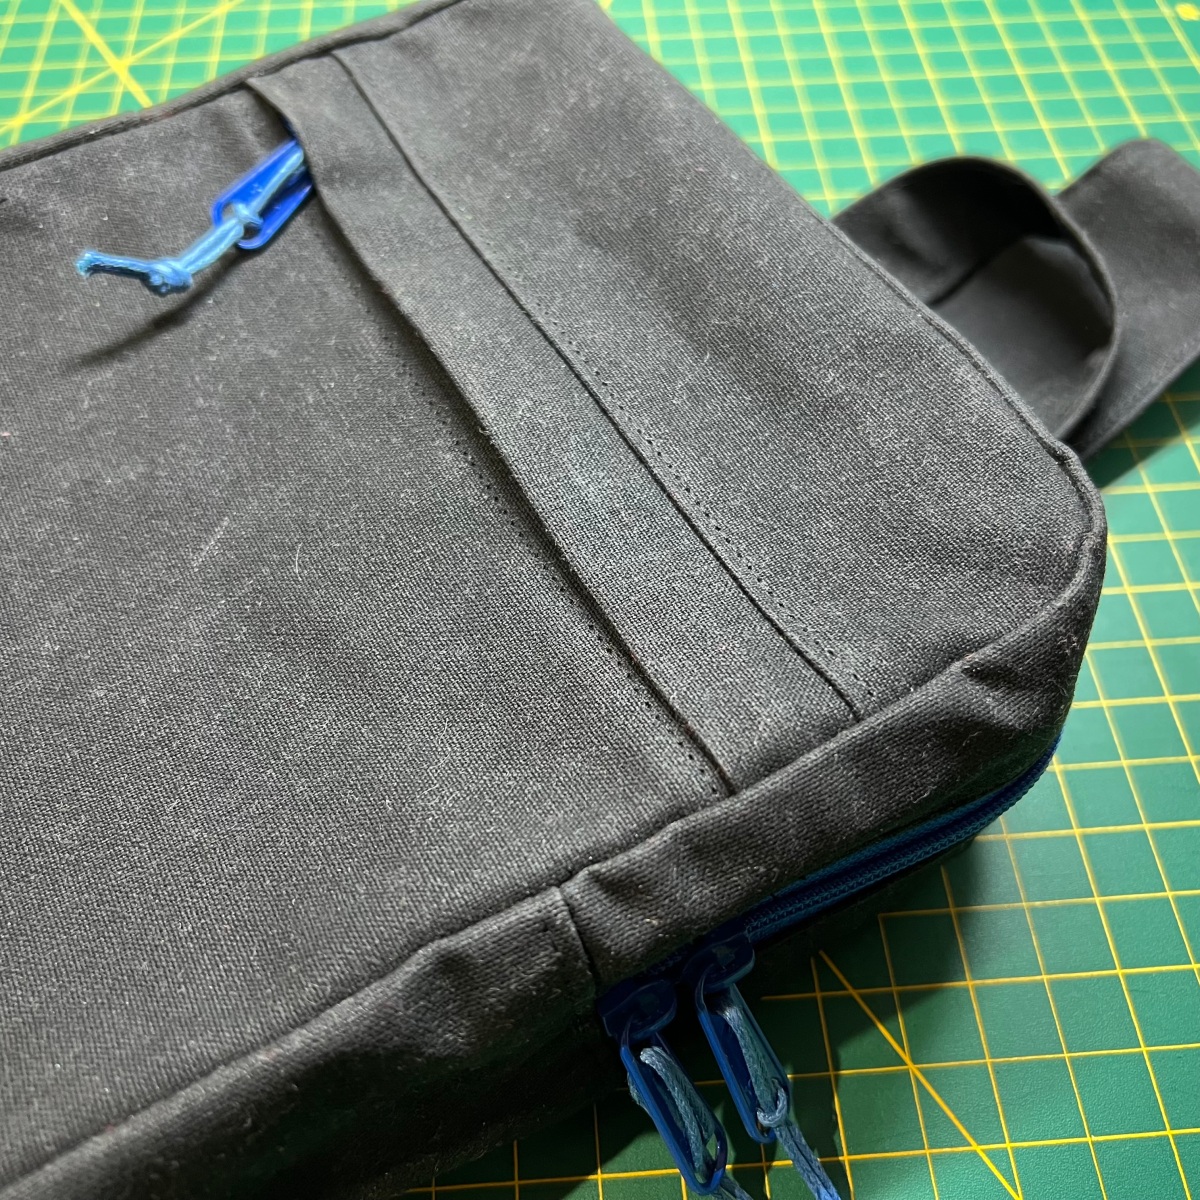
The bag comes with an outer zip pocket, and a main compartment with an inside pouch pocket. But if you are making the bag, you can always add extras. I added a swivel cord attachment for my keys, and a carry handle.
The outside fabric is black waxed cotton canvas, which is “cotton impregnated with a paraffin or natural beeswax based wax”. It’s water-resistant, but it feels dry and not at all sticky. Over time, it develops a distinctive worn-in appearance and patina.
This is my first time sewing with cotton canvas. It’s very odd fabric to sew with. In some ways it’s extra easy to work with, because it folds almost like cardboard and stays put. That’s good, because you can’t iron it.
It’s also a 441 gsm (13 oz/yard), which is really heavy fabric. There is one point where I needed to sew through 8 layers of it, and my sewing machine needed a tiny bit of encouragement, but she pulled through! I used a 16/100 jeans needle and that was about right.
The pattern calls for 0.53m of fabric for the outer bag, so I bought 1m which was wider than quilting cotton, and there is so much left! If you cut this carefully, with the accuracy you would cut fabric for a quilting project, there will probably be some extra for another project.
I chose black because I wanted a black bag, because that’s the colour of my soul! It also coordinates with my wardrobe really well. If I used a different colour the waxed cotton look would be a bit more visible.
I’ve used hardware in a colour called gunmetal because there was no black. But I’ve brightened it up with electric blue zippers.
If there is one thing I hate, it’s a black bag interior (how can anyone find anything in there?). So, I’ve used bright lime green quilting cotton for the interior. This was in my deep, deep stash.
There is also a bit of bright blue grosgrain ribbon I used to make the swivel cord attachment for my keys, and a tag on the front of the bag. This came from a deadstock non-profit fabric shop.
I am super happy about how this turned out. It’s a pretty heavy-duty bag but it doesn’t feel heavy when you wear it.
If I had to make it again, I might add an interior zipper pocket. I didn’t think the iPad mini would fit, but now that I do, I would add padding to the interior pouch pocket. I’d add a bit more topstitching, because it will produce a bit more of that crumply waxed canvas look over time. I’d also use a smoother, seatbelt-style webbing, and use that for the handle as well as the strap. But these are very small changes. This bag is amazing. I really love it.
I like the results so much, that I’m thinking about making another, which is good because there are already people at my house asking me when they can have a bag like mine.
Summary
Pattern Review: Digital Sandhill Sling by Noodlehead Patterns, available in just the one size. Fabric: Waxed cotton canvas in black from Blackbird Fabrics for the outside. The inside is made with quilting cotton. The print is from the Jack & Jenny collection by Laurie Wisburn for Robert Kaufman from my deep stash. Notions and Equipment: Needle: jeans 16/100. Zippers and bag hardware in “gunmetal” colour from Wawak. I also used some grosgrain ribbon from Our Social Fabric. The smaller swivel hook was left over from a previous project. I didn’t use interfacing.
Size: One size. Cost: Pattern: $10 USD. Fabric: About $40. Webbing: $3. Hardware: About $15. Although there is enough of the hardware for a second bag, and enough fabric for three. Sewing Level: Advanced, if using waxed cotton canvas. Average, otherwise. Modifications: I added a swivel cord attachment for my keys, and a carry handle. Results: Amazing!
Ages ago, my son picked out some fabric for a quilt, and did I actually make the quilt? No. Then, yes. Finally!
Now that he’s not small anymore and well into his teens, I had to ask him if he still wanted a quilt with these fabric designs, but it was still a “yes”! So I got to work.
The fabrics are from a fat quarter bundle featuring the Get Together collection by David Walker for Free Spirit/Westminster Fibers. The solids are Kona solids, but this bundle has been in a bin of fabric for so long, I’m not even sure what they are. My guess: Chocolate, Delft, Earth, Key Lime, Windsor? I got it from Mad about Patchwork. Am I too embarrassed to write them after all this time to find out what they are? Yes, I am.
The design is a series of very large equilateral triangles. I thought this would suit the larger print, and I wanted lots of animals on this quilt. It was super easy to piece. I didn’t use a pattern, or rather, I used my own.
I usually draw out my patterns on graph paper first, and that’s what I did here. Three out of four kids in the family helped me arrange the triangles.
The backing is Trees on Green Background from The Magic of Christmas collection by Lori Whitlock for Riley Blake Designs. I got this from The Quilting Shed. I messed up my quilt math and had to order more fabric. Twice. lol. So a special thanks to Andrea for the patience and speedy delivery.
Yes, I should have removed all the fluff. (sigh)
The backing is pieced and I used some of the scraps from the triangles to make a stripe of tiny squares down the centre. Giant equilateral triangles make lots of scraps.
The backing is pieced using scraps.
On the back, there are also two bears. My second child is a teenager and claims to be too old to be tucked in. This way the bears can tuck him in each night. My quilt my rules.
Good-night bears!
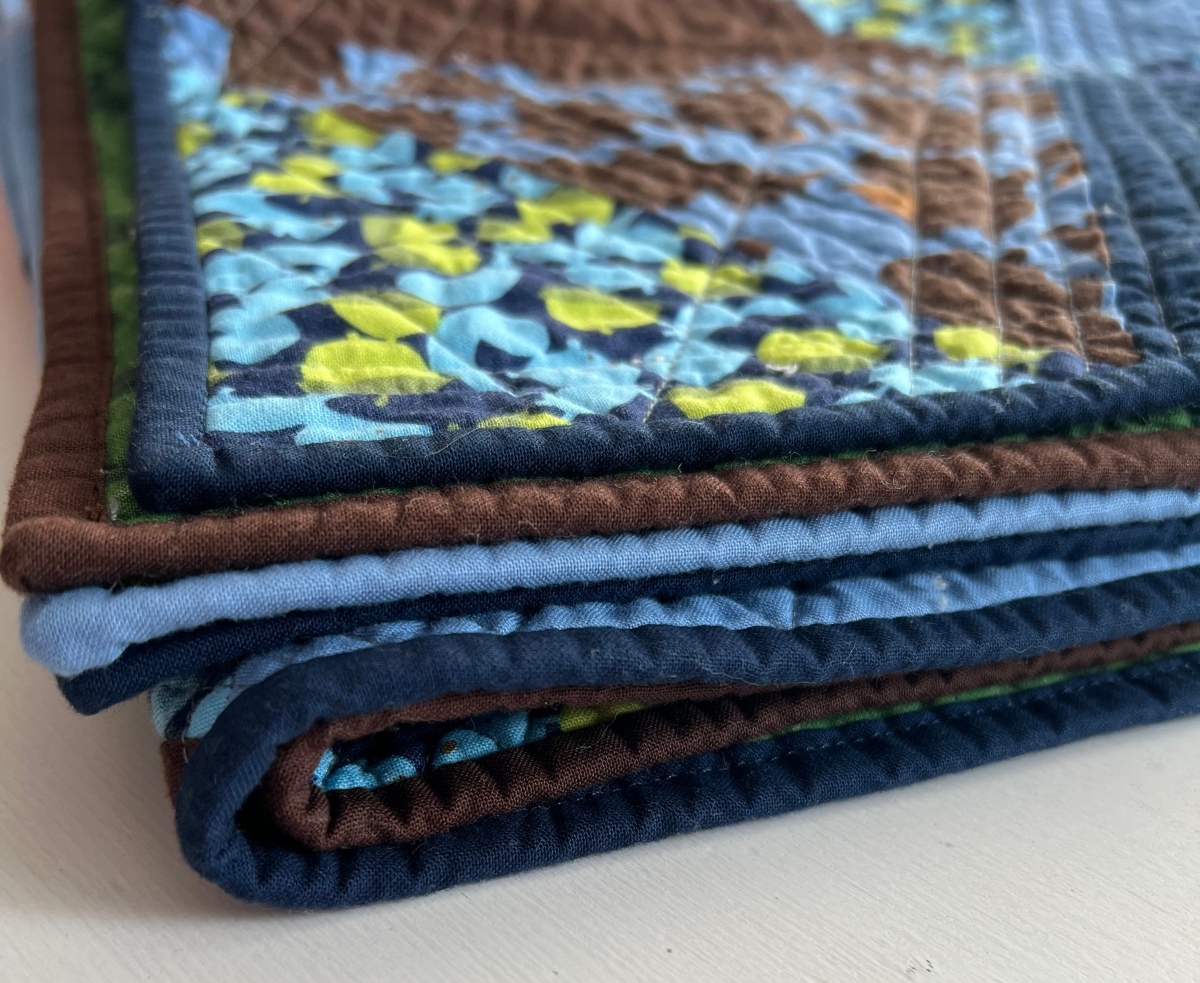
I used a scrappy binding (2.25″ wide). Nothing else matched the colours as well as I wanted. It’s machine sewn.
Scrappy binding.
The straight-line quilting design echoes the triangles, but the pattern also creates little stars if you look very closely.
Machine-sewn binding.
This is a twin-size quilt. I wanted it to last a long time. Who know when I’ll make another? And yes, it was a beast to sew on my regular (non-quilting) sewing machine.
Can you see the tiny stars?
I love a crinkly quilt, so this is 100% cotton fabric, 100% cotton batting, and 100% cotton quilting thread. (I used Sew-All thread for the piecing though.)
Yes, there is still a bit of fluff on this quilt.
The thread is a medium grey. It was really hard to find something that looked right with this assortment of dark colours. The grey was great with everything (including the backing), except maybe the limey-yellow.
As planned, it all shrunk just a tiny bit in the dryer for this lovely, cozy, crinkly texture.
I was having trouble with my imperfect straight-line quilting. I was worried it wouldn’t look as good as I hoped. But the crinkle fixes all.
Quilt Summary
Pattern: my own.
Fabrics:
Quilt Top:
Prints are from David Walker’s Get Together collection for Free Spirit/Westminster Fibers, including:
Flock of Birds in Navy
Squirrels and Trees in Blue
Squirrels and Nuts in Navy
Bears in Line in Blue
Solids are Kona solids. I’m not sure of the colours, but perhaps: Chocolate, Delft, Earth, Key Lime, Windsor?
Backing: Trees on Green Background from The Magic of Christmas collection by Lori Whitlock for Riley Blake Designs.
Thread: Gütermann Cotton thread #9310.
Size: 74.5″ x 91.5″ (Twin).
Some in-process shots, before this quilt was finished.
The skirt comes in three sizes: maxi, midi and mini. This time I made the mini.
The instructions are very easy to follow. This would be a great project for a beginner sewist – just maybe not in this fabric (details below).
This was a birthday gift for my tween, and I made the size 4 with no modifications. Next time though, I might make this a size up – the length was good (a bit less mini on my tween) but the waist was a bit tight and I had to add a bit of length to the elastic. It’s tough sewing for tweens using adult patterns because the fit and the measurement chart don’t always match.
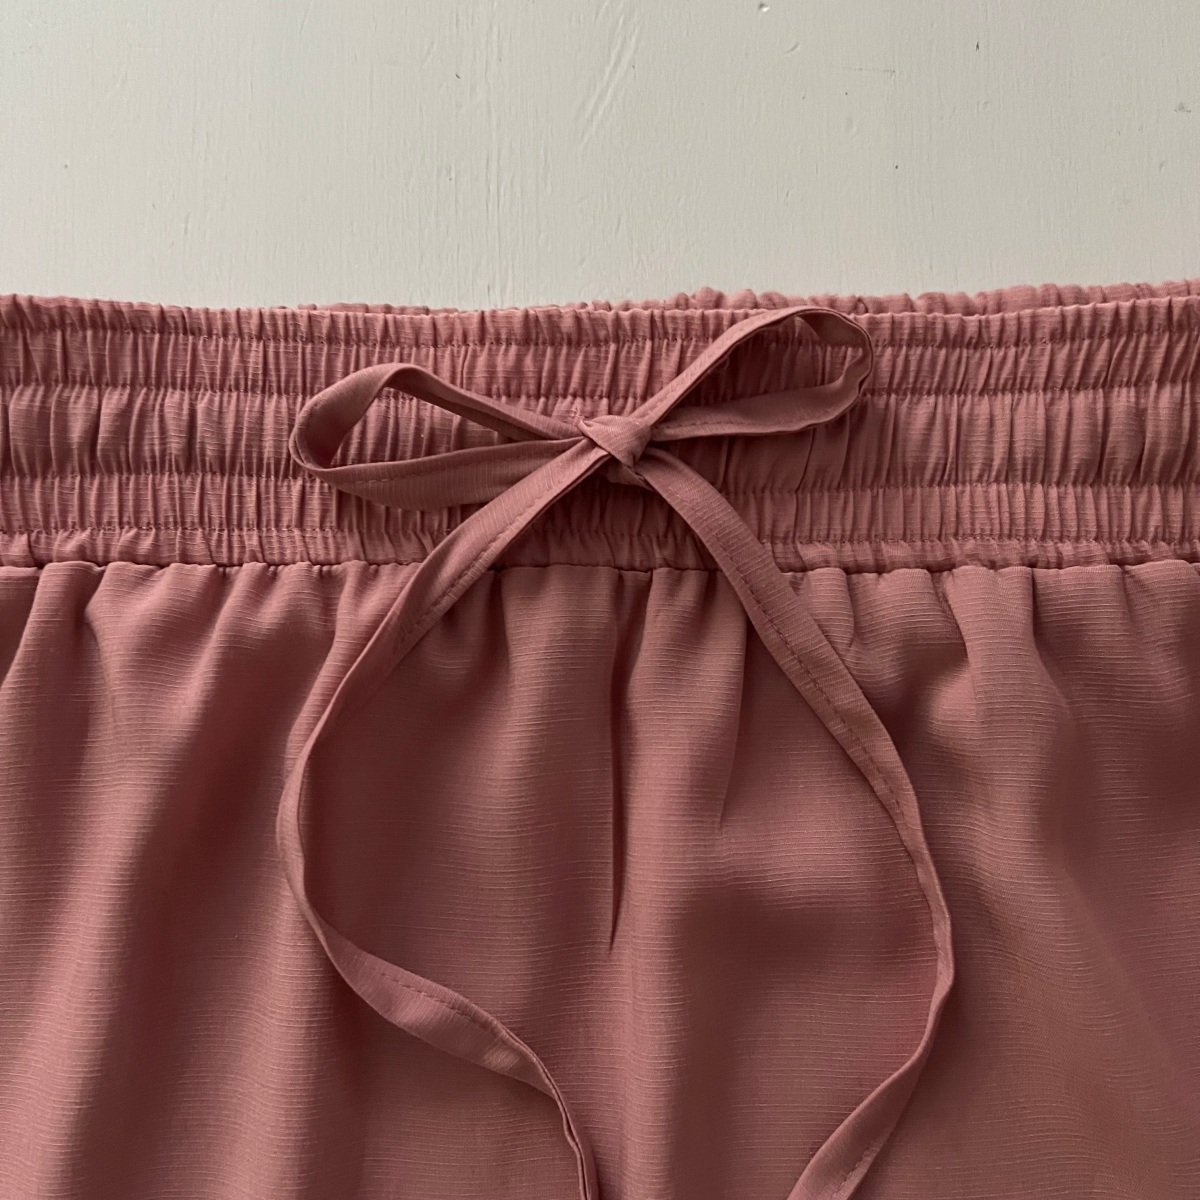
The fabric is a textured tencel rayon in old rose from Fabricville. The fabric has a lovely drape, but it’s slippery and shifts easily. This is the fourth project I’ve made in this fabric (in different colourways), including a dress, blouse, and a maxi skirt (both unblogged), so I guess I’ve decided the drape is worth it!
The trick is to cut the pieces with a rotary cutter and keep all the pieces flat as you work. The fabric also frays a lot, so it’s good to get it sewn up quickly and seam finish as soon as possible. French seams work best, but I used zigzags here as the gathering makes french seams tricky. I did a baby hem.
I love this little skirt! So cute! Hopefully it will get a lot of wear 🙂
Summary
Pattern Review:True Bias Mave skirt available in sizes 0-30. Length: Mini. Fabric: Old Rose Tania textured tencel rayon from Fabricville. I used 1.1m of fabric, but modified the cutting layout a bit to do so. Needle: universal 9/70.
Everything that’s old is new again, especially the 90s.
I was recently looking for a sewing pattern for a cargo skirt, but nothing seemed to match what I was looking for. So I checked out the vintage patterns on eBay, and found McCall’s 2220, circa 1999.
It looked perfect, and the pattern includes a maxi skirt, a knee-length skirt, as well as shorts in two-lengths. It’s a good deal.
This pattern has a fly (I used a metal jeans zipper), with a good amount of top-stitching that add a lot of style. The waist closes with a trouser hook.
I used bronze-look hardware throughout, and the topstitching thread is a beige heavy-duty thread (Gütermann Mara 70 topstitching thread) that coordinates.
The pockets are the larger cargo style with velcro or buttons for the closure (lol, so 90s!). I switched them out for heavy-duty snaps.
During the 90s, patterns often came in a more restricted size range. This one was 14-18, and I originally wanted it for myself. But my daughter wanted a skirt and needed a size 12, so I graded the whole pattern down.
The fabric is a dark-wash 8.8 oz denim chambray – quite a bit lighter than standard denim. That made it quite a bit easier to work with.
The inside seams (not shown) are all faux flat-felled.
I’m very happy with the results – the skirt looks modern and polished, and can be dressed up or down.
Summary
Pattern Review: Vintage McCall’s 2220 circa 1999, in size 12. Fabric: Cotton chambray from Fabricville (8.8 oz) Size: 12. Cost: Pattern: $17.50. Fabric: about $10. Sewing Level: Easy. Modifications: I graded down to size 12, and used snaps for the pockets. I also stitched the waistband close by machine.
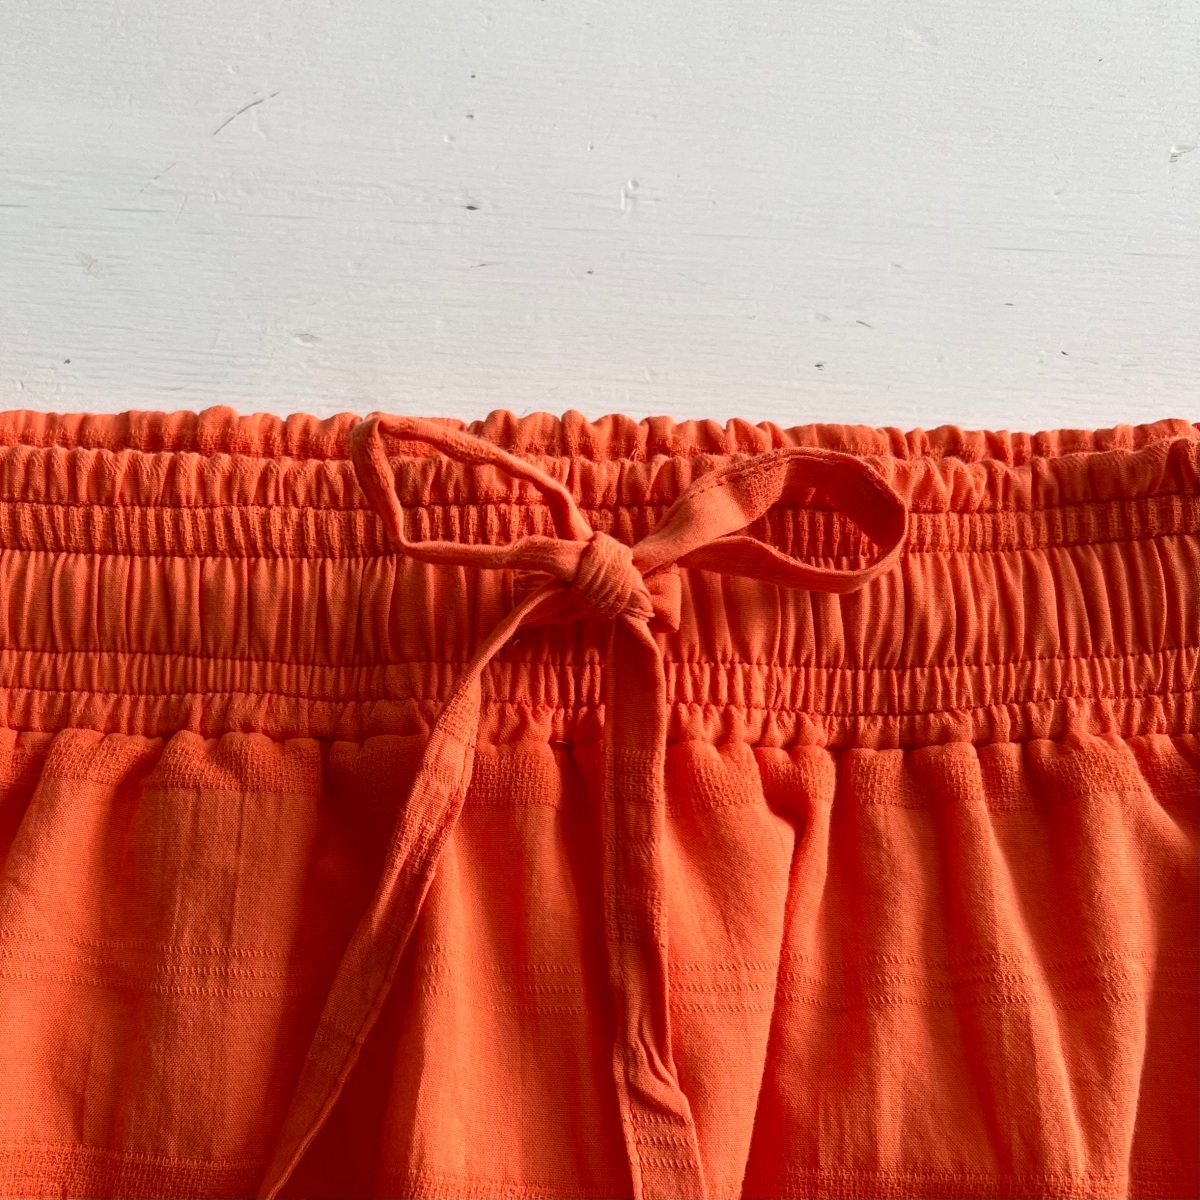
I sew a lot of neutrals so I thought it might be nice to do something colourful for a change – the Mave skirt from True Bias in a bright orange, just in time for summer weather.
The fabric is an orange, smocked cotton voile from Our Social Fabric. Our Social Fabric is a Vancouver-based non-profit fabric store selling donated deadstock fabric and fibre arts supplies. Buying deadstock keeps fabric out of landfills, and the price is right. But a couple of other online shops currently have the same fabric in different colourways.
I used a white cotton batiste for the lining. The orange voile is a bit transparent. Batiste makes a great lining because it is so breathable. It’s great for hot weather clothing. But in this skirt, it also makes the orange colour really pop.
I went with the midi length for the Mave skirt. The pattern has a large number of variations. I would have preferred a maxi skirt, but there wasn’t quite enough fabric for that, especially since I needed to match the stripes.
I made a size 18 based on my waist measurements (as directed in the instructions) but I could probably go down a size.
The pattern is great. I didn’t make any changes. I’ve actually used this pattern three times now, but I have a bit of a blogging backlog, so this is the first one I posted. More to come!
I’m really happy with the results. This skirt is a lot of fun.
Summary
Pattern Review:True Bias Mave skirt, in size 18. Fabric: Striped smocked cotton voile, in orange from Our Social Fabric. Size: True Bias uses their own sizing system, but this is about a size 18 in ready-to-wear sizing. Cost: Pattern: $16 USD. Fabric: $18.80. Sewing Level: Easy. Modifications: None.
Apparently, lime green is on trend, and so are the 90s – though maybe not this part of the 90s. Lol. Hopefully this reads a bit more Colors of Benetton and a bit less Fresh Prince of Bel Air. Either way, it’s lots of fun.
I have a couple more lime green pieces in the sewing queue, so hopefully I can get some full outfit photos soon.
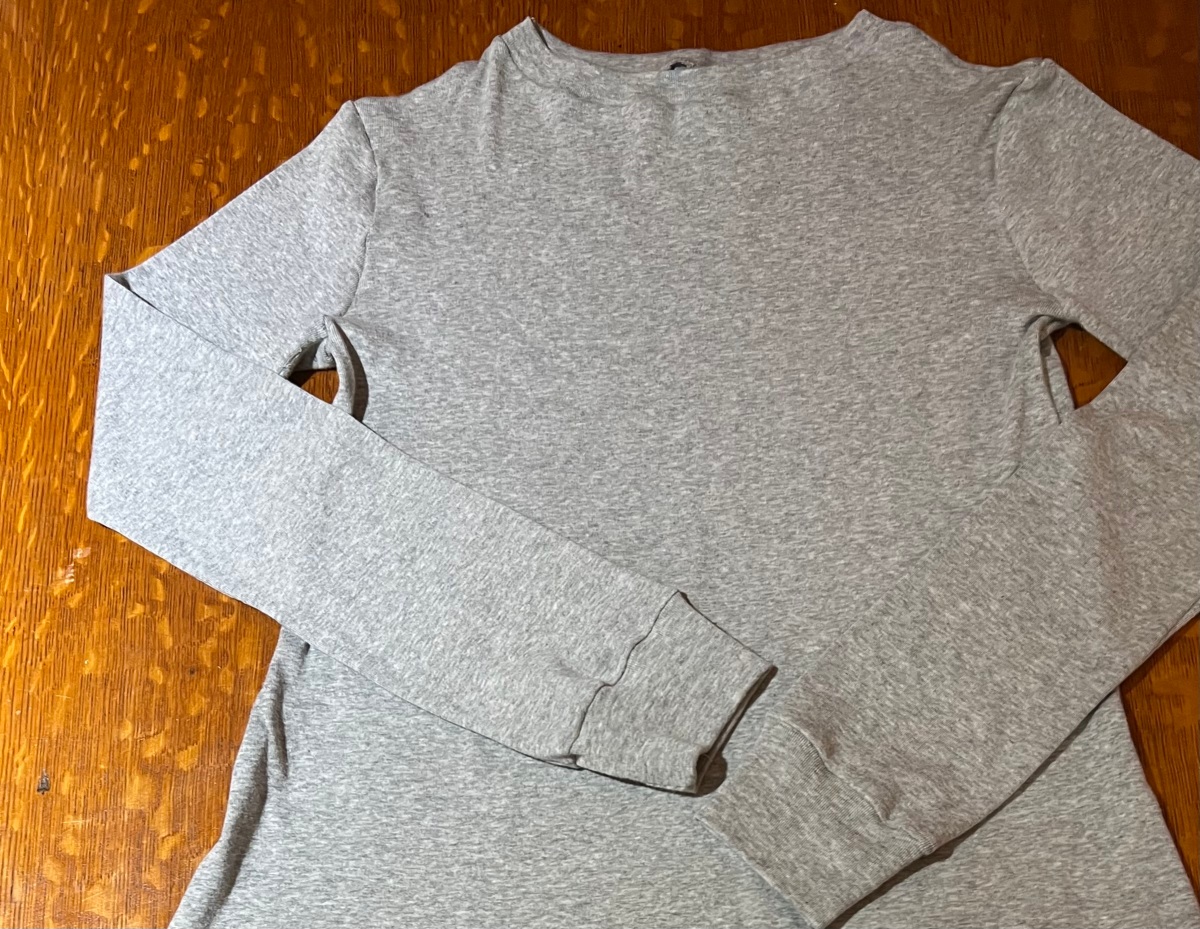
The fabric is a cotton french terry from l’Oiseau Fabrics that I bought ages ago. The lime green cotton ribbing is leftover from some t-shirts I made when my kids were really little.
This pattern is Jalie 3355 Sweatshirt, Hoodie and Sweat Pants. Jalie uses their own sizing system, and this is size AA. This is this is the equivalent of a size 14 in ready-to-wear.
The pattern instructions say to “use the size corresponding to full bust measurement for the sweatshirt”. Haha! No. Don’t do this. I mean, I know I’m a D-cup, but this is a knit!
I did try this first, but the sweatshirt was huge and very unflattering. It would be “ok”, if you had a drapey fabric and were looking for an oversize look. And yes, this is on trend right now! But for this project, I wanted something a bit more “standard” in terms of sizing. And the fabric I used is a more structured cotton terry.
So I recut in the size that matched what I usually buy in a ready-to-wear sweatshirt (two sizes below what the pattern maker recommends), and that was indeed the right size.
I made a couple of changes. The neck band looked a little wide in lime green, so I made it a bit more narrow. I think it would look great as is, if I had chosen monochromatic ribbing though.
I added a little tag to the back so you can tell which way the shirt goes.
I also removed 3″ (about 7.5 cm) from the length. I didn’t want this to look cropped, but I also didn’t want it too long. This fabric is a bit structured, so it doesn’t pool nicely at the waist. But in another project, depending on the look you want and fabric you choose, the length might work. With the reduced length, the waistband just covers the waistband of my jeans.
If I make this again, I might make the body narrow a bit more towards the waist, instead of the more rectangular default cut. I have a store-bought sweatshirt like that and I find it’s flattering on my figure. But it will depend on the project.
The instructions were great. Again, I love having the instructions as a PDF download. I usually sew with my tablet nearby, and this is very convenient.
Summary
Pattern Review:Jalie 3355 Sweatshirt, Hoodie and Sweat Pants. View B. Fabric: Cotton french terry from l’Oiseau Fabrics and cotton ribbing from my stash. Size: Available in sizes size 2T (toddler) to about size 22. This is size AA, the equivalent of a 14. Cost: Pattern: About $14. Fabric: I can’t remember! Sewing Level: Beginner Modifications: I reduced the with of the ribbing at the neck, and removed 3″ (about 7.5 cm) from the length. Results: Fun!
Not every sewing project works out the way it is supposed to.
But let’s start with what went right. This fabric is a cotton baby rib knit, in grey, from Our Social Fabric. It might be the softest cotton rib knit I’ve ever used. And it’s on the thinner, drapey-er side. It’s so nice that I ordered more.
The project requested by Kid No. 3 was a simple knit dress. So I bought McCall’s Learn-to-Sew M8064. It’s described as a pullover dress, fitted through bust, with neckline, sleeve and hem variations. I made View C (long sleeves, crew neckline, knee length).
This is a very simple pattern with just 5 pieces (in View C).
This dress comes in sizes XS (4-6) to XXL (24-26). My daughter is a size 10-12, but I opted for the size Small (8-10).
This dress fits very large. If you make this dress, you will need to size down a lot.
I’ve been sewing for a long time, and have made a lot of items in knits. This pattern had an odd fit for a knit.
In a close-fitting dress, in a knit, there should be negative ease. If you look at other popular patterns, the ease in the bust is negative, or zero.
True Bias Nikko Top And Dress 8101: -1.5″
McCalls 6886/8058: 0″
McCall’s 7561: 0″
If you look at reviews for McCalls 6886, 8058, 7561, people are often going down a size, to get that negative ease.
If you look at this pattern, there is +1.5″ of ease in the bust. That means that going down just one size might not be enough.
I would recommend choosing the size based on whatever would give you about an inch of negative ease in the bust.
I ended up recutting the entire pattern, after having sewn it. What I finished with was smaller than the XS. I had to grade smaller, beyond the sizes listed.
I still had issues with the fit though. The neckline was very wide – more of a bateau neckline, and I had wanted a crew neckline. The shoulders were set very wide apart and extra low.
I wonder if maybe the pattern makers used a pattern block for wovens and did not test?
The pattern also used a 5/8″ seam allowance – which is odd for a knit (but typical for Big Four knit patterns). I had already trimmed down the seam allowances on my pieces before I started, but it was still very large.
I added cuffs to the sleeves and removed a bit of length. My daughter is a bit shorter than average.
In the end, after recutting, the dress is cute and does get worn, so I’ll chalk this up as a success. But I’m not likely to use the pattern again. It’s a bit disappointing, because this pattern had a lot of potential – cute design, multiple views that all look wearable, good instructions, quick to assemble.
Summary
Pattern Review: McCall’s Learn-to-Sew 8064. View C. Fabric: Cotton Baby Rib Knit, Grey, from Our Social Fabric. Size: S (8-10). Cost: Pattern: About $15. Fabric: $18.80. Sewing Level: Beginner Modifications: I added cuffs, and recut the whole dress. Results: Ok.
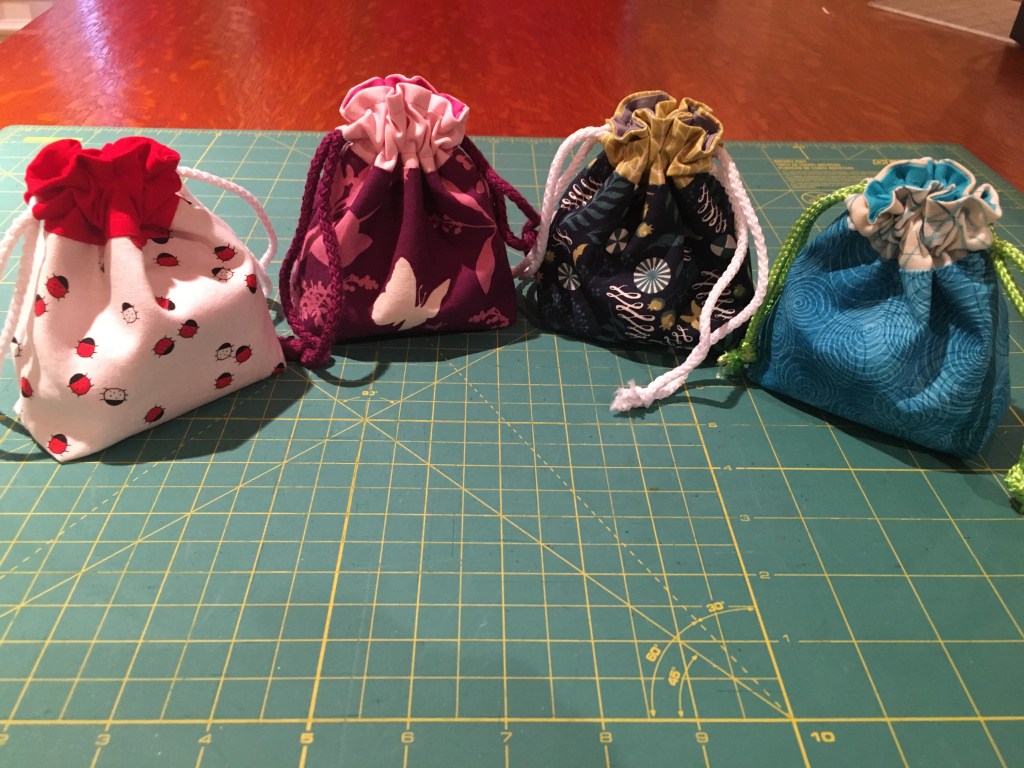
My kids have gotten into Dungeons & Dragons, so I made them tiny bags to hold their dice.
The pattern is the Lined Drawstring Bag from Jeni Baker Patterns. It comes in eight sizes and this is the smallest. My finished bags are about 4.5″ by 3.25″ by 1.5″(or 11.5 cm by 8 cm by 4 cm).
They really are tiny – just the right size for a handful of dice.
These were really fast to sew up. The pattern is very clear and this would be a great pattern for a beginner. The pattern maker has also done a sewalong with this pattern and there is an expansion pack.
The larger sizes would make a good replacement for wrapping paper, but here the bag is the gift. These were Christmas gifts, but I have a bit of a blogging backlog, so I’m just posting to these photos now.
The fabric is all from my scrap bin. You can use any quilting cotton, and buy fat quarters of course. But this is also a great stash-busting project if you do any quilting.
Each bag uses three different fabrics, so there is a lot of room for making these really unique. Each bag I made matches the personality and preferences of each of my four kids.
The only change I made was to use cording instead of sewing ties for the bags. That made the project a little quicker and I like the look. The cording was leftover from makinggym bags.
Summary
Pattern Review:Lined Drawstring Bag from Jeni Baker Patterns. Fabric: Quilting cotton (from my stash). Sizes: Available in eight sizes. This is the “Tiny” size. Cost: Pattern: $9. Fabric: 0$. Sewing Level: Easy. Modifications: I used cord instead of fabric ties. Results: Great!